Peameal Bacon of Toronto

On my first trip to a city I always try to experience the things that the place is famous for, especially the food. Recently I was in Toronto which is a very diverse city with all kinds of food, but the peameal bacon sandwich is one of its most iconic specialties. 

Toronto was once known as Hogtown, thanks in part to the vast stockyards where in the mid to late 1800’s cured pork products like bacon were sent to the United Kingdom, where there was a shortage at the time. In 1900 over half a million pigs were processed for export in Toronto. 

So what is peameal bacon exactly? It’s what we call “Canadian bacon” in the US. It’s made from pork loin, rather than belly, so it’s much leaner than typical bacon. It’s brined and cured, not smoked. It was originally rolled in ground dried yellow peas to help preserve it, but cornmeal became much more widely available in the 1900’s and also preserved the meat better. 

Peameal bacon, also sometimes called back bacon, is juicy and salty but not nearly as salty as streaky bacon. It’s served sliced and makes a very fine sandwich. 

One place to try the famous peameal bacon sandwich is at the St. Lawrence Market. You can see peameal bacon in the cases of butcher shops and there are at least two places that serve the sandwich, Paddington’s Pump, a full service sit down restaurant and Carousel Bakery, a market stall. The Paddington’s Pump sandwich features thinly sliced peameal bacon and comes on a crusty roll with tomato and lettuce and some slaw and pickle on the side. At Carousel Bakery the sandwich is served on a hamburger bun with thick cut peameal bacon. You can also get the “breakfast on a bun” with peameal bacon, a fried egg and cheese. 


After you try the peameal bacon sandwich, I recommend trying the eggs benedict at the classic diner, The Senator which is Toronto’s oldest restaurant. It’s two poached eggs on peameal bacon with hollandaise sauce on a homemade biscuit. Both are so good that I'm not sure which I prefer!

Disclaimer: My thanks to Tourism Toronto for hosting me on this trip. 

Milk Chocolate Lemon Cookies

Untitled

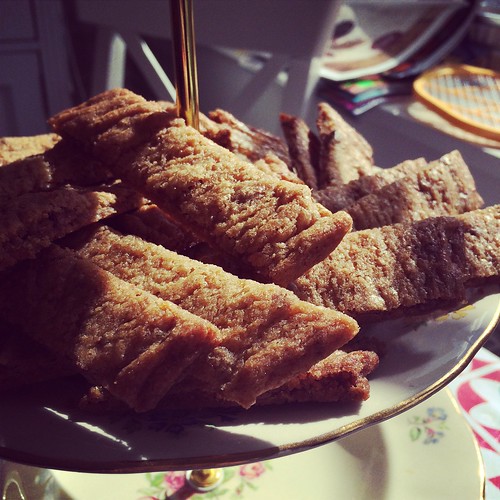
This type of cookies is called "snitt" in Swedish - translates into "cuts" which is exactly the method for making these. Just like Italian cantuccini, you shape long logs of dough, bake and slice. These are not re-baked like biscotti though, instead they're left to cool and that leaves them crispy on the edges with a soft, chewy middle. These particular cookies are full of milk chocolate and lemon zest. Truly amazing.

Milk Chocolate Lemon Cookies
makes 40 or so

150 g butter, softened
140 g caster sugar
140 g brown sugar
1 egg
2 tsp vanilla sugar (or 1 tsp extract) 
1/2 tsp baking soda
pinch of salt
240 g all-purpose flour
100 g milk chocolate, coarsely chopped
zest from 1 lemon

Start by creaming the butter and both types of sugar very, very well. (My butter was, as usual, not softened, so I just creamed it for much longer.) Add the egg and vanilla and beat until mixed. Add the dry ingredients - baking soda, salt and flour - and mix until combined. Finally add the chocolate and the lemon zest. 

Shape into four slender logs and place on lined baking sheets. Bake at 175°C for 10-12 minutes. Remove from the oven and leave to cool for a minute before cutting them, diagonally, into cookies. Leave to cool completely. 

These freeze very well but lose some of their chewiness. 


Pack a Lunch! Cookbooks

It’s back to school and that means bag lunches. Or maybe like me, you don’t have school age kids, but still want to start packing lunch to take to work. It’s easy to get in a rut, but these three cookbooks offer many ways to jazz up your lunchbox. 

The Banh Mi Handbook is the latest book from Andrea Nguyen. In the past she has written about Vietnamese food, dumplings and tofu, perhaps convincing you to make your own. But I had to wonder, when I can get a terrific banh mi sandwich for just a couple bucks, would I want to make my own? The answer is YES because Nguyen goes well beyond what you might find at a Vietnamese sandwich shop. 

What I absolutely love the most about this book in addition to the versatility is the focus on ease and simplicity. There are lots of shortcuts and no shame if you choose to buy bread or mayonnaise or doctor some liverwurst to make a tasty pate. The book offers the basics and traditional recipes for fixings like carrot and daikon pickles, headcheese terrine and Chinese barbecue pork but also offers tons of non-traditional options too to keep things interesting. Go vegetarian with coconut curry tofu or an edamame pate. I know I’ll be making the warm sardine and tomato sauce sandwich and the oven fried chicken katsu. These are sandwiches that will make your mouth water! 

Mason Jar Salads, a slim volume of lunch and breakfast worthy recipes includes why-didn’t-I think-of-that ideas that are perfect for when you want to bring something delicious from home. The book includes smoothies, soups, dips and more. But salads are the main event and author Julia Mirabella comes up with very creative layered ones like spinach, blueberry and blue cheese, or barley and zucchini salad and even a layered cobb salad. Dressing layered on the bottom of the jar keeps everything from getting soggy and makes shaking the new tossing. So smart! This book will give your lunch a jolt.


A traditional Japanese lunch is bento, or box lunch. As someone who loves variety, I go crazy for bento boxes, especially the ones they sell at railway stations in Japan. They often contain 5 or 6 small nibbles like flavored rice balls, pickles, salads and all kinds of meats and vegetables. They might look complicated but they don’t have to be. That’s the message behind Effortless Bento. This book shows you how to make ahead over 300 items so you can create a tasty and exciting lunch in no time. The full color pictures really help to show how a few items come together to make a meal. There are single dish bentos too like dry curry bento. 

As long as you have access to a refrigerator, you can make all kinds of delectable vegetable and meat dishes, many can even be frozen ahead of time. The one caveat about this book is that the recipes are Asian, though not all Japanese, some do require a trip to an Asian market for specialty ingredients like burdock, dried shrimp or lotus root. But plenty of recipes use only 3-5 very basic ingredients.

Disclaimer: These books were provided as review copies and this post includes affiliate links. 

Homemade Chocolate Shell

Untitled

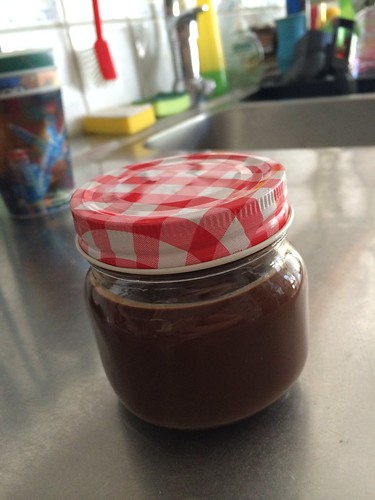
Magic Shell is an ice cream topping I first came into contact with in the US - where else? Well, you can find a version of it in Sweden too, nowadays. Or you can, as I have, make your own!

It's essentially a pourable chocolate topping that freezes instantly when poured over ice cream. It hardens into a crunchy chocolate shell. And it's yummy! My version has three ingredients, whereas the commercial obviously has many more. Mine does taste a little bit of coconut, but that's more of a feature than a flaw to me. If you don't like that, seek out a coconut oil with no flavor, there are plenty of those.

Let's get to it!

Homemade Chocolate Shell
250 g dark, high quality chocolate
200 g coconut oil
100 g corn syrup (substitute white baking syrup if you're in Sweden)

Simply melt all three ingredients together in the microwave. Use short intervals and stir well, to make sure nothing burns.

When everything is nice and smooth, stir it together, and pour into a squeeze bottle or a jar. This recipe makes quite a lot, but it will keep for a long time at room temperature. If you put it in the fridge, it'll go solid - don't do that.

Very promising book


I just got Veckans Favoriter ("Weekly Favorites") by Sara Begnér in the mail. I have to say, she is one of my favorite Swedish cookbook authors. Her recipes are easy to make, approachable, no weird ingredients that you can't find at the store, pretty healthy but still fun, playful and very flavorful. This book focuses, as the name implies, on weeknight dinners. Lots and lots of them! I'm seriously stuck in a rut, which is also why I have nothing to blog about, so I'm definitely eager to try some new things. 

Peach Ketchup Recipe & Ball Brand Giveaway!


I can, can you? Sure you can! Canning is not hard to do at all, especially if you pick a really easy project like canning fruit. This year I received a box of luscious peaches from Washington state. They were perfectly ripe, but a bit crushed in spots due to poor handling in transit. Instead of canning slices or halves, I used the fruit—some perfect and some not so perfect—to make peach ketchup! 

Peach ketchup is a lovely peachy color, but it tastes very much like tomato ketchup. Taste it before you can it, and adjust the spices and sugar to suit yourself. Use really great tasting fruit, it should not be brown or overripe, but if it is soft in spots, that's ok. Use the tangy sweet and sour ketchup just as you would regular tomato ketchup. It’s particularly great on potatoes. 


As in years past I am proud to be a  “Canbassador” for the Washington State Fruit Commission and to tell you about the Can-It-Forward event, sponsored by Ball Brand. 

Check out this site for a live webcast of canning demonstrations with chefs, as well as recipes and tips 

A go-to resource for canning and freezing stone fruits, offering how-to-tips, recipes, health information, customizable canning jar labels and more

Here are more of my picks for great canning resources:

A community site with recipes and tutorials for canning, preserving, cheese making, foraging, drying and dehydrating and pretty much anything that is culinary DIY 

This is kind of the “bible” for learning how to safely preserve food at home, there’s even a self study course 

AND NOW THE GIVEAWAY! 
This year Ball Brand is offering one lucky reader a fabulous prize package of:

·   New Limited Edition Spring Green Heritage Collection Jars, these limited edition jars commemorate the 100 year anniversary of the Ball brothers’ “Perfection” Jar and come in a beautiful green tint.  These are being produced only in 2014 and are available in both pint and quart varieties.  (Pint retail value: $9.99 per case/ Quart retail value $12.99 per case)
·   Fresh Herb Keeper is an ingenious container to keep herbs fresh for up to two weeks. (Retail value: $12.99)
·   Dry Herb Jars are a perfectly-sized solution for storing your dried herbs. Great for storing seasonings, spices and rubs too! Stackable, low-profile design makes pantry or drawer storage more efficient than old, mis-matched containers. (Retail value: $4.99)
·   Frozen Herb Starters preserve your fresh seasonings in ready to use cubes filled with butter, oil or other liquid for easy and flavorful meal starters. (Retail value: $11.99)
·   5 Blade Herb Scissors  with stainless steel blades to gently cut and evenly slice herbs like basil, parsley and cilantro. (Retail value: $9.99)
·   Ball Blue Book with 125 pages that will guide you while you learn about preserving, this book provides information on equipment, instructions for the preserving method and recipes! (Retail value: $6.49) 
Leave ONE comment telling me what you'd most like to can or preserve and I will choose a winner at random on Wednesday August 20th, 2014. In order to win you must have a US mailing address and you must include your email in the field where it is requested (it will not be publishes and no one will see it but me). 

Peach Ketchup 
Makes 8 1/2 pint jars

5 lbs fresh ripe peaches, pitted and peeled and cut into chunks*
2 - 3 cups brown sugar (start with 2 cups and add more to taste)
2 cups apple cider vinegar
1 Tablespoon onion powder
1 Tablespoon ground ginger
2 teaspoons mustard powder
1/2 teaspoon ground cloves
1 teaspoon grated nutmeg
1 Tablespoon kosher salt 

In a large pot, bring peaches, apple cider vinegar, brown sugar, seasonings to a simmer over high heat. Reduce heat to medium, and simmer about until peaches are very soft about 15 minutes. 

Using a slotted spoon, transfer the peaches to a blender or food processor. Process until pureed and return the peach puree to the pot. Gently simmer and reduce for hour and mixture is thickened. 

Transfer peach ketchup to hot sterilized canning jars. Wipe rims and seal with clean lids and rings. Process 15 minutes in a boiling water bath or according to manufacturers' instructions. Let cool to room temperature and store. Open jars should be stored in the refrigerator, just like tomato ketchup. 

*To peel the peaches you can score, blanch, and shock the fruit, but I find a very sharp vegetable peeler also works great and is much less bother. 

Enjoy! 

Disclaimer: My thanks to Washington State Fruit Commission for the fruit and Ball Brand for the canning and preserving supplies. 

Flippin Burgers vs. Svenska Hamburgerköket

Untitled
Flippin' Burgers

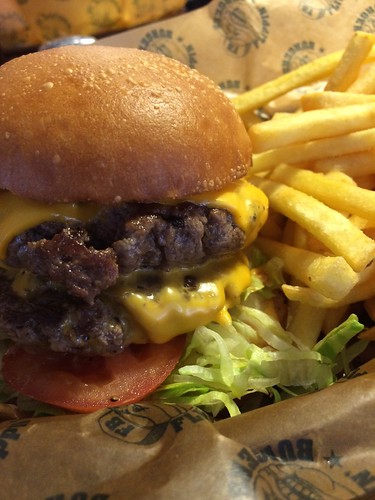
Hamburgers are always in style, or so it seems. In Stockholm, there's an on-going competition for the title "best Burger", and various lists are posted all the time. I don't really eat out that much so I haven't tried all the supposedly "best" ones, but I have tried Flippin' Burgers several times. And I have to say, they're definitely my favorite. They now have a bigger place, with more seats, but you still have to show up right when they open (4 pm) or be prepared to wait. However, it will be worth it.  The burgers are fantastic - fat and juicy and bursting with flavor. I especially recommend coming so hungry that you can have a double burger - they're incredible.

Fries are fine, but nothing special. But they're served with a very vinegar-y mayo, which is nice.

Untitled
Svenska Hamburgerköket

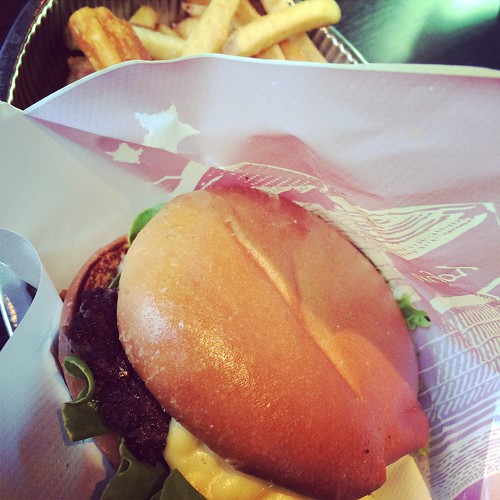
Svenska Hamburgerköket has a pretty off-beat location, in Hägersten. You order at the bar, pay, and get your food. Sit anywhere. It's not huge, but it wasn't full with people either so no wait when we were there. The menu has slightly more options than Flippin' Burgers does, especially with some seasonal specials. We went for the classics, though, to try them out. How did they add up? Well, pretty well, but not as good. The burger itself seemed to release much more juice, which left the meat a little dry and my hands very greasy. It also had more toppings, which is of course optional, but I felt that they weren't of the best quality. Cheese didn't taste like much.

Fries however were very yummy! Better than Flippin'. But no free dipping sauce...

Untitled

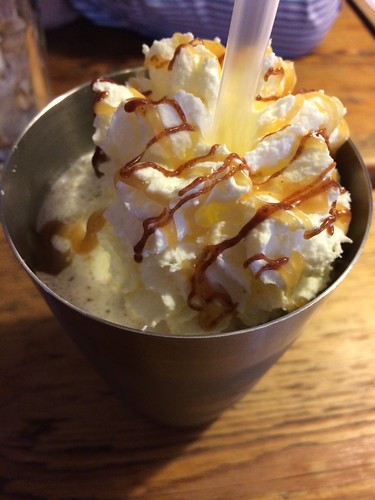
The milkshake from Flippin' Burgers, made with Ben & Jerry's ice cream. This one was made from their Chew Chew Caramel - delicious obviously. Svenska Hamburgerköket has pretty good milkshakes too, but not like this. So to sum it up? Best burger is at Flippin' Burgers. But both places are good, and I'll gladly eat at both.

Flippin' Burgers
Observatoriegatan 8
Stockholm
facebook

Svenska Hamburgerköket
Tellusborgsvägen 78
Hägersten
facebook

Whittard instant tea and hot chocolate

Untitled

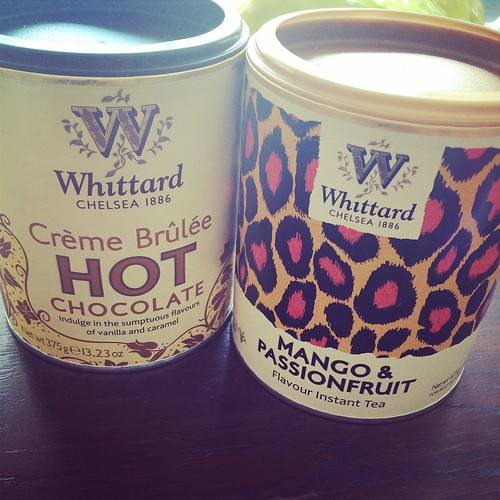
Another find from my recent vacation! I haven't found Whittard - a UK brand -in Sweden before, but I did find these in a small design shop in Ystad. They had a rather large selection of these two type of goods - instant tea and hot chocolate. It's been a super warm summer here, so while hot chocolate seems a bit out of season, ice tea is most definitely more current. This is a refreshingly fruity flavor, with mango and passionfruit. It doesn't really taste much of tea, but it's nice and not too sweet.

The creme brulee hot chochaolate.. well, I'll have to get back to you on that when it gets a little bit colder!

Highlights from the American Craft Council San Francisco Show

I went to the American Craft Council San Francisco Show to check out the craft food and beer, but I was blown away by the quality of the exhibition this year. There are very inspiring and beautiful things for your kitchen or dining room. This is a great place to look for a gift, a centerpiece, kitchen design element or functional kitchen tool. It runs all weekend, August 9 and 10, 2014 at Fort Mason, San Francisco. 

Here are some highlights:


I have two terrific  pepper grinders but I would trade them both for one of these stunning ones from Kermode Woodturnings. Jerry Kermode also makes a companion salt grinder, wood topped cork bottle stoppers and rolling pins.  His bowls of all sizes are also drop dead gorgeous. 


I’ve long admired these almost art nouveau or American craft porcelain pieces from Lynne Meade Porcelain. They are wheel thrown and then hand carved, and are inspired by shapes found in the natural world, often sea forms or plants. 


Many woodworkers make cutting boards, but the puzzle trivet boards from David Levy of Hardwood Creations are quite unusual and wonderful in that you can arrange them in a myriad of shapes. 


I was drawn to the handcrafted cherry wood spoons from Jonathan’s Spoons, but also spatulas, pie servers and the particularly lovely tea strainers.  


Robert Woldow of ArtsCraft Seattle fuses glass to make bold and eye-catching dishes, platters and bowls. Everyone who walking into this booth was drawn to a different piece with a different shape or set of colors.


Jewel like Italian inspired glass pieces from Peter Vizzusi or Magic Sands Glass are radiant and sparkly. I particularly like the ones with metallic swirls and ribbons.  


I was impressed by the lovely earthy color palette and natural designs to these luminous pieces from Natura Designs long before I even spoke to the artist, who is coincidentally a beekeeper. He makes them from an organic resin of  beeswax and embeds natural specimens like twigs or seed pods to create unique designs. 

This year the American Craft Council San Francisco Show is featuring a marketplace and taproom where you can find members of the Good Food Merchants Guild and San Francisco Brewers Guild offering speciality food and craft beer.  Participating Good Food Merchants Guild members include Vivid Foods, Sweet Dragon Baking Company, Rancho Llano Seco, Mead & Mead’s Maple Syrup, and Two Valleys Olive Oil. Over the weekend participating San Francisco Brewers Guild members include local microbreweries Anchor Brewing Co., Headlands Brewing Co., Magnolia Brewing Co. and Speakeasy Ales & Lagers. Be sure to head to the back of the hall and up the stairs to check it out. 

Red Quinoa Salad with Sesame-Honey Dressing

Untitled

We've been away for almost two weeks this summer. It's been very nice and a lot of fun - but I sure haven't been cooking much. We've relied on super-quick dinners, like hot dogs, to make sure the kids would eat. Boring. And when I got home, I was craving veggies, and craving cooking.

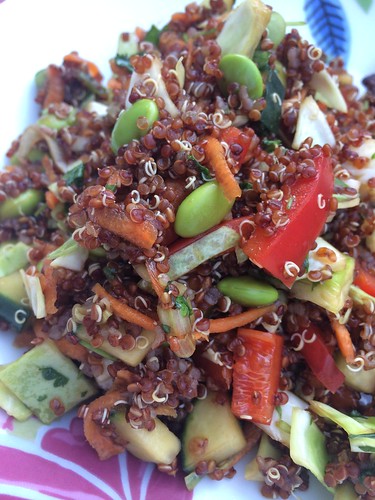
So I saw this shared on facebook, from the often-inspiring Two Peas and their Pod. I changed some things, but pretty much went with it. We ate some meat with it - pan-fried pork - but it's a good meal in itself. You could serve it along side chicken or fish too, though... or add some avocado.. or feta cheese.. yeah - feel free to adapt as much as you want!

Red Quinoa Salad with Sesame-Honey Dressing
serves 4 (and maybe with some leftovers, too)

400 ml red quinoa (regular white is fine too - my store was out)
800 ml water
1 tsp salt
3 small carrots, coarsely grated
200 g edamame beans, shelled and cooked
200 ml cabbage, finely cut
1/2 cucumber, diced

dressing:
about 100 ml light soy sauce
1 tbsp rice wine vinegar
1 tbsp runny honey
1 tbsp sesame oil
grated ginger - about a teaspoon

Start by putting the quinoa in a strainer and rinse with cold water. Rinse really well. This is necessary to remove the bitterness from quinoa. When rinsed, place with the water (twice the amount of quinoa you're using) in a saucepan, add salt and bring to a boil. Cook for 15-20 minutes - the type of quinoa will determine the time. All the little "tails" should be released and the water pretty much absorbed. If it's soft but there's still water, just drain it.

Mix the cooked quinoa with all the veggies. Whisk together the dressing and toss with the salad. And you're done! This can be prepared well in advance, if you'd like.