Hello there! Remember how last week I said I'd be traveling for a bit, but I'd check in and blog once in awhile? Hahahahahahahahahahahahahaha. That was before my almost-one-year-old decided to wake up at 4am every morning. She'd be like, what, woman??! My body is telling me it's 7am, so wake up, and make yourself that hot smelly drink with all of the fatty cream, and play with me!! And so my days started in the wee hours of the morning, and by early afternoon my brain felt like mush. Hence, no blogging. However, that didn't stop me from making cookie dough. Because when you're out of town for a week and your brain is mush, you need to buy basic groceries like bread and milk and brown sugar and chocolate chips. I'm not normal.
One morning last week, at like 5:17am, I decided to make cookies. Did I want to make a large batch? No. Did I want to make a small batch? Not really. Instead, I wanted to make one GIANT treat, for me to eat for breakfast (mushy brains are dangerous). But for reals, what's more fun than a huge cookie... shared amongst friends or eaten alone in the dark before the sun comes up.
Preheat oven to 350 degrees. With a mixer, cream together the butter and both sugars in a medium sized bowl until light and fluffy. Add the vanilla and the egg, and mix until combined. Add the dry ingredients, and mix until just combined. Stir in the chocolate chips. Place onto a cookie sheet lined with parchment paper, and flatten into a circle (should be about 1-inch thick). Place cookie sheet in the fridge for about 30 minutes, and then bake for 15-20, until cookie has browned slightly.
Those of you who follow me on Instagram might have noticed that I've started up something called Instagram Baking Challenge together with my friend Dagmar. Each Sunday, we choose a recipe to make the following week and then we post about it with the tag #instabakingchallenge
Anyone can join in! The idea is just to get us inspired to bake again, no pressure! For our first week, we made this delicious and easy bread, originally posted by Matgeek. It's really simple and my kids loved it - I made two batches that were completely devoured.
Rye bread with crushed rye and molasses Yield: 2 loaves
300 g water 60 g rye flour 60 g crushed rye 300 g water (again) 25 g fresh yeast 20 g salt 50 g butter at room temperature 600 g all-purpose flour 40 g dark syrup/molasses
Bring the first 300 g of water to a boil. Measure rye flour and crushed rye into a bow and add the hot water. Stir well until smooth. Cover and let it cool.
Heat the second 300 g of water until just tepid. Crumble in the yeast and let it dissolve. Add salt and butter.
Add all the rye batter from the first step. Add flour and syrup as well. Stir until smooth, cover and leave for ten minutes.
Knead for 5-6 minutes. The dough will be very loose, that's ok. Cover and let it rise for about 45 minutes or until doubled in size.
Turn the dough out onto a well-floured surface, divide in half and shape two loaves. Place in two buttered bread tins and leave to rise for 30 minutes. (Honestly, you can skip this step - just scrape the dough straight into the bread tins. It worked out fine.)
Heat the oven to 250 degrees centigrade. Score the loaves and put them in the oven. Add some water or ice on a baking tray at the bottom or the oven or use a spray bottle - this is to create steam.
Lower the temperature to 200 degrees. If the loaves start to look too dark, cover with aluminum foil.
Bake until the core temperature is about 97 degrees. Leave to cool completely before removing to a rack.
Just wanted to let everyone know that I’ll be on vacation this week. I'm looking forward to a nice, relaxing break, and if everything goes according to plan, I will accomplish absolutely nothing.
We’ll continue to publish your comments and questions, but unfortunately, I won’t be around to respond to the tiny fraction of them I usually do. That means you’ll have to rely on each other, so good luck with that. Thank you for understanding, and we’ll see you next week!
Seriously, I don't know why I've posted so many sauces lately! I guess it's mainly what I've been making though - it's such an easy way to vary a meal. Here's yet another super sauce to serve with fish, especially fried and battered fish. (Although these in particular are bought frozen and baked - a simple shortcut which works well for us)
Dill sauce for fish
4 tbsp sour cream
1 tbsp mayonnaise
100 ml fresh dill, finely cut
1 tbsp chives, finely cut
salt
1/2 tsp honey
Stir everything together and season to taste. Let it sit in the fridge for at least half an hour.
I’ve never been a huge fan of the calzone, and I assume most people that don’t eat their pizza crusts feel the same way. However, since this has been requested hundreds of times, I thought I’d put my personal feelings aside, and give the recipe a shot.
I call it a recipe, but it’s actually a technique, since the calzone's greatest feature is its ability to accept any combination of cheese, meat, and vegetables as a filling. Today, calzones are most commonly stuffed with the exact same toppings that go on a pizza, which, besides the crust issue, was one of my main problems with it. I mean, why not just fold a pizza in half, and call it a day?
So, I decided to do what I hear is a more traditional filling, featuring ricotta, fresh mozzarella, and ham. The result was as enjoyable, as it was surprising. It was almost, but not quite, lasagna-like. The extra crust didn’t bother me as much, and everything seemed to work together beautifully.
I decided to recommend our Wolfgang Puck dough recipe, because it's fast and easy, and features a nice lightly textured dough, but any prepared pizza dough will work nicely.
Just be sure to bake this long enough. If you make these the same size, it’s going to take about 15 minutes at 500 F. Your calzone may look nicely browned at 10 minutes, and it will be tempting to take out, but the dough will still be raw. You really want to push this to the point of almost burning.
And what happens if you go too far, and it does burn? No problem. Just order a pizza and fold it in half. So, whether you’re already a calzone lover, or a reluctant skeptic like me, I really hope you give this a try soon. Enjoy!
Ingredients for 4 Calzones:
1 batch of our Wolfgang Puck pizza dough (get the recipe here), divided into 4 dough balls
8 slices prosciutto
2 cups ricotta, drained if necessary
4 ounces fresh mozzarella, sliced thin, and drained on paper towel
1 1/2 cup finely diced smoked ham
freshly ground black pepper to taste
cayenne to taste
(note: before folding, I forgot to drizzle the top of the filling with a teaspoon of extra virgin olive oil, which I think would have been a nice touch.)
corn meal for the pan
2 cups marina sauce for dipping, optional 1 egg for egg wash Parmesan cheese for dusting tops - Bake at 500 F. for 15 minutes
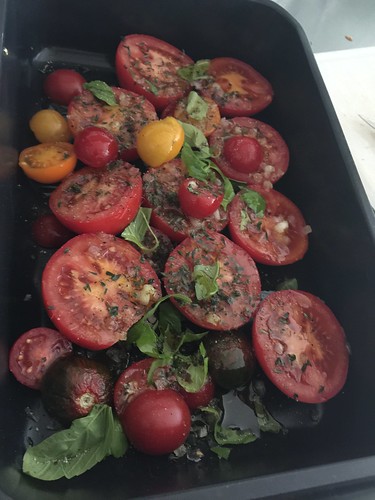
This is one of the simplest but also tastiest sauces you can make. It's perfect when you have tomatoes that are starting to get a little old, soft and wrinkly. Just take those, cut them in half and place cut side up in a roasting tray. Drizzle with olive oil, some chopped garlic and shallots, and a little salt and pepper. Add some fresh herbs if you have them.
Roast at 200°C for about half an hour. The tomatoes should have softened quite a bit and released some liquid. Tip all the contents of the pan into a mixer. Add a little pinch of sugar and a little apple cider vinegar, and blitz until smooth. (Be careful, it's hot!)
Pour into a pot and cook until it's as thick as you like it. At this point, you could certainly add some browned beef mince if you'd like. Season to taste with more salt, sugar and vinegar.
No matter what you’re grilling this summer, chances are good you’re going to have more hot coals than food to cook on it, which makes baba ghanoush the perfect post-barbecue recipe. Instead of those glowing embers going gently into the sweet night, why not grill up some eggplant, and make one of the world’s best vegetable dips?
You can cook the eggplant any way you want, but charcoal is my favorite. Next best would be cooked over a gas burner, but that can really mess up your stove, so I guess the real next best is baked at 400 F. until they collapse, and get very soft.
As you can see in the clip, this is not a very complicated recipe. As long as this is seasoned thoughtfully, you should be enjoying a wonderfully savory, yet refreshing dip. Just be sure to pay attention to the salt. Eggplant, like almost every vegetable, needs a good amount of salt to bring out the flavor.
The difference between a terrible dip, and a stellar spread can be as little as a half teaspoon of salt. Wait for the mixture to cool completely in the fridge, taste it ice-cold, and adjust with more salt, as needed. Same goes for the lemon, cayenne, and the tahini.
If you grill these after a cookout, but have had too much fun, and don’t feel like doing any more work, you can peel them the next day, and this will work out the same. I hope you give this delicious baba ghanoush a try soon. Enjoy!
Over the weekend, I was treated to the best homemade egg salad I've ever had. It was made by a great cook who didn't want to reveal her specific recipe... however, she did tell me it's basically mayo, dijon mustard, dill, parsley and of course salt and pepper. But the big revelation was her technique for making it the PERFECT fluffy consistency... she smashes the hard-boiled eggs with a fork. Brilliant! I've never tried that before, but you can better your bottom dollar that I will now (I like to talk like Orphan Annie). Soooooo good.
We will be traveling a bit this week, but I will try and post as much as I can. And heading to the Today Show next week, more on that to come!
We’re going to take a couple days off for the holiday, but wanted to wish you a very safe, and festive 4th of July!
Fabulous summer cookouts are just one of the many things that makes America great, and I hope you’re involved one of those tomorrow; preferably serving something you saw on Food Wishes (like the no-baked cheesecake flag cake pictured here). Enjoy the food, the fireworks, and possibly the adult beverages, and we’ll be back next week with brand-new videos, as usual. Stay tuned!
.png)