Halloween Candy season may be over, but Pumpkin has not gone out of style just yet. I saw these online the other morning at 5AM because my 14 month-old is all, SCREW YOU TIME CHANGE, THIS FEELS LIKE 6AM STILL, and I realized I actually had everything I needed to make them! Chocolate chips, pumpkin puree, almond butter, pumpkin pie spice and honey. That's it. A dark chocolate shell with a creamy pumpkin butter center. Oh, and sea salt on top because chocolate can barely go without it these days. They were easy to make and delicious (however I recommend popping them in the fridge to let the bottom chocolate harden before you add the filling and top).
Enjoy these. Enjoy your weekends. Enjoy your sleep if you're getting any (I hate you).
So, Halloween came and went. We had a really fun party for the kids and their friends - 14 kids in total. They really enjoyed "mummy sausages dipped in blood", "grape caterpillars", "icy gummyworms" (one little girl sat petrified for several minutes, believing those were real) and "graveyard muffins". Lots of fun!
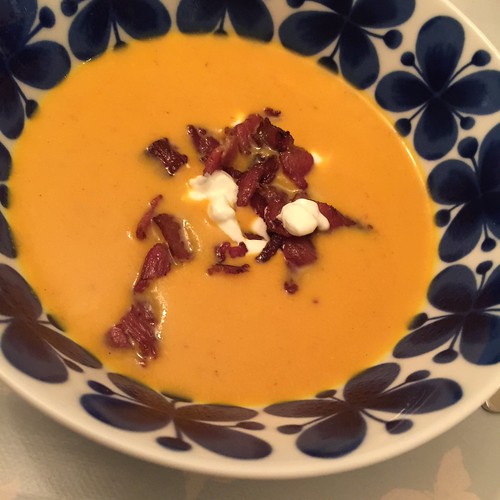
However, we didn't carve a pumpkin. I couldn't find a good one in time, and then I sort of just ran out of time. We had some other decorations, but Titus was disappointed since he had looked forward to a pumpkin soup. (Not that you actually want to make soup from your carved pumpkin, but he doesn't know that...) So, last night I made this lovely soup instead. Very yummy! Well, I thought so at least - neither the kids nor the husband were fans. Oh well... Roasted Butternut Squash soup
1 small butternut squash - peeled and cut into large dice 1 onion, finely diced 1 carrot, finely diced olive oil 1/2 tsp ground coriander 1/2 tsp ground cinnamon about 1 litre chicken stock 100 ml cream salt
Start by tossing the squash with a little olive oil and salt, and roast in a 200°C oven for 20-25 minutes. It should be lightly browned.
In a soup pot, heat some olive oil and sauté carrot and onion with coriander and cinnamon until soft - about ten minutes. Add the squash dice, and the chicken stock. Cook for at least ten minutes on low heat, make sure everything is nice and soft.
Use a blender, or an immersion blender, to make the soup completely smooth. Stir in a little cream if desired (always desired in my family), and season with salt and pepper to taste.
We served this with crispy fried bacon and sour cream and a nice sourdough baguette.
Did you know Thanksgiving is 3 weeks from tomorrow? NOBODY PANIC. I say that as I panic, of course. However, if you tune into the Today Show everyday this month, you'll become inspired with a new Turkey Day idea. Today Carson and I made two side dishes: his mom's "Drunken Mashed Potatoes" and my version of the Midwest classic, Green Bean Casserole.
If you missed the segment or want to view the recipes, click here.
Since August I have ordered groceries from the online delivery service Instacart more than 10 times. Crazy, right? Not at all. I am absolutely thrilled with their service and here’s why:
Choice
I can choose from among several stores. Not just big box stores like Costco and Target and supermarkets like Safeway and Whole Foods, but also smaller local stores like Rainbow Grocery that offer lots of bulk ingredients.
Price
For most of the stores, the prices are exactly the same as they are in the store!
Service
The service is amazing. You can not only track your order, but chat in real time with the shopper who is shopping for you. If they can’t find the item you want, they get in touch immediately with suggestions for replacements that you can approve. Also if you decide you want more or less of something or if you forgot an item or can’t find it in the database you can communicate that too.
Accuracy
They get my orders right, which not something I experienced when I tried ordering directly from a supermarket unfortunately.
Time
It’s a huge time saver for me to be able to skip going to the store. Of course, I do still go to the farmers market and shop for some things like fresh produce, but there are many items I really don’t need to personally pick out such as eggs, dairy products and cleaning supplies.
Convenience
I love being able to not just shop, but comparison shop at multiple stores to see who has the best prices on items I want to purchase. In the time it takes me to make a list, I can place an order online. The detailed receipts are also extremely helpful when I’m creating recipes for clients and need to keep track of my expenses. Last but not least, no looking for parking, no waiting in line to check out and no schlepping heavy bags of groceries.The groceries come right to my front door (up two flights of stairs).
The Instacart website, iPhone app and iPad app are super easy to use and after just a few deliveries I was sold. I gladly paid $99 for an Instacart Express membership and now get free delivery within 2 hours for any purchase over $35 (good for one year). Want to try it? Use this link and get $10 and free delivery to try the service.
Do they deliver near you? So far they are operating in California, Colorado, Connecticut, District of Columbia, Florida, Georgia, Illinois, Indiana, Maryland, Massachusetts, Michigan, Minnesota, New Jersey, New York, Oregon, Pennsylvania, Texas, Virginia, Washington. But you can check with your zip code.
Disclaimer: I was not paid to write this post although I do get a tiny credit towards my account if someone signs up using the link provided.
I always tell people I’m not a cookie eater, but I guess that depends on the cookie, since when it comes to these gingersnaps, I can’t get enough. As soon as these cool, I chain-eat them until they’re gone; but that’s not my fault. I blame the amazing spicy-sweet flavor, and irresistible texture.
Speaking of irresistible texture, I’ve got some homework for you. You’re going to have to make batches of these to find out your own optimum baking time. I know, it’s hard work, but you need to somehow find a way.
Depending on the exact size of your dough balls, and how crispy, or chewy, you want these, the baking times will vary from 10 to 15 minutes. As far as ingredients go, the crystalized ginger is technically optional, but not too hard to find (check the bulk section), and it really gives the cookies that extra kick of ginger flavor and heat.
Obviously, you can also adjust the spices to suit your tastes, but don’t make these too mild. They’re called “snaps” for reasons other than their texture. I really hope you give these a try soon. Enjoy!
Ingredients for about 50 to 60 cookies (depending on size):
2 cups plus 2 tablespoons all-purpose flour
1 1/2 teaspoons baking soda
1/2 teaspoon fine salt
2 teaspoons ground ginger
1 1/2 teaspoons ground cinnamon
1/4 teaspoon ground cloves
1/4 teaspoon ground black pepper
1/8 teaspoon cayenne
12 tablespoons room temp unsalted butter
2/3 cup white sugar
1/3 cup finely chopped candied ginger
1/4 cup molasses
1/2 teaspoon vanilla extract
1 large egg, beaten - Bake at 350 F. for 10 to 15 minutes, depending on desired texture.
A few years ago I heard Ted Turner speak about bison at the Sustainable Food Institute at the Monterey Bay Aquarium. He slipped in, spoke was very opinionated and went over his allotted time, but he certainly was engaging.Attendees learned he is one of the largest landowners in North America, a proponent of conservation and a big believer in bison. He talked about bison as a means to both economic viability and environmental sustainability. Turner has a staggering 51,000 bison on his land, which is over 10% of the entire population in North America. He also runs Ted's Montana Grill where he serves bison.
Bison are an integral part of the prairie ecosystem, grazing in herds and fertilizing plant cover. The natural behavior of bison is still very much intact because unlike cows, they are not domesticated. Bison meat is naturally lean and is a good source of protein, iron, zinc and selenium.
If you've never cooked bison before and can find it in ground form, try using it in chili. The bison itself tastes very similar to beef but is a bit richer and less fatty. This chili is mostly beans, but flavored with chiles, chile powder and spices, onion, garlic and fire roasted canned tomatoes. I generally prefer buying whole tomatoes rather than diced ones, they break up and cook down more easily than diced. Chili is one of those dishes that just gets better over time as the beans soften and the flavors meld together. I serve it with plenty of toppings--grated jack cheese, chopped green onions and cilantro and sometimes a dollop of sour cream or Greek yogurt.
2 roasted peeled Hatch chiles (mild, medium or hot), optional
2 Tablespoons chili powder (mild, medium or hot)
2 teaspoons cumin powder
1/2 teaspoon ground oregano
28 ounce can whole fire roasted tomatoes and their juice
1 Tablespoon tomato paste Salt
Place the sorted black beans in a large Dutch oven and cover with about 10 cups of water. Bring the water to a boil, then lower the heat and simmer, partially covered, until tender.
In a large pot combine the bison, onion, garlic and peppers. Cook, crumbling the meat until the meat browns and vegetables soften. Add the spices and cook for another 2 minutes then crush the tomatoes with your hands and add them and the juices to the mixture.
Add the cooked beans and 2 cups of the bean cooking water and the tomato paste to the meat mixture, partially cover the pot and simmer gently for 30 minutes or until thick. Season to taste with salt.
Are you ready for the best weekend ever? A glutenous, guilt-free, indulgent weekend full of candy and costumes and sports?? At least that's the type of weekend I'm about to have. I have my red cape and red lipstick all ready to go because I'm sorry, but I couldn't find a single non-slutty Little Red Riding Hood dress, so that's what I'm going with. My Grandmother/Wolf, Hawkeye, Ariel and Elmo are very excited to trick-or-treat. And last night I made these Homemade Take Five bars following this recipe, hence the beginning of the best weekend ever... because when you put peanut butter on pretzels and then caramel on top of that and then dip the whole thing in chocolate YOU WIN!
For more Homemade Halloween treats - like Butterfingers, Snickers, Almond Joys, Peanut Butter Cups and Peppermint Patties - click here. For Baby Ruth Bars, click here. Happy Halloween!
As I joked about in the video, a fruit salad has to be pretty damn good to actually get a name, and the venerable Waldorf salad is certainly worthy.
I realize that there are a small group of you who won’t be able to wrap your heads around mayonnaise with fruit, and that’s a shame, since it means you won’t get to enjoy one of the great combinations of all time. By the way, if you are one of the aforementioned people, but like mayo slathered all over your sandwich, containing slices of sweet, ripe tomato, and caramelized onions, then you have some explaining to do. Also, coleslaw. I rest my case.
Embellish this as you see fit, but I really like it best with just the four ingredients seen here. Things like dried cranberries can add a nice seasonal touch, but for me, the chewy fruit gets in the way of that addictive crunchy/crisp texture. I really hope you give this old-school, but timeless Waldorf salad a try soon. Enjoy!
Ingredients for about 1 cup dressing (enough for 2 Waldorf salads below):
3/4 cup mayonnaise
1/4 cup crème fraiche or sour cream (I used CF)
juice from 1/2 lemon
1/2 teaspoon sugar
1/4 teaspoon salt
pinch freshly ground black pepper
pinch cayenne
1 tablespoon finely chopped tarragon
For 2 large or 4 appetizer sized Waldorf salads:
2 large crisp, sweet apples, cut in 1/2 inch cubes
First things first, the winner of the Happiest Little Baker Giveaway is Valerie! However, HLB is also going to give the first 50 readers that sign up 10% off using the coupon code SIRIOUSLY10. Go, go and join (they even have allergy-friendly kits). My kids are already talking about next month's box :)
Now, on to this wonderfully delicious baked spaghetti squash recipe. I was at a cooking class last week with my mom and some friends, and it was centered around root vegetables. One thing the chef prepared was this baked spaghetti squash with a blue cheese sauce. Any vegetable that disguises as a pasta is my kind of vegetable, especially smothered in a creamy, salty, tangy sauce. This tastes sinfully good, but is much better for you than a bowl of fettuccine alfredo... right? A perfect Thanksgiving side dish, this would be... signed, Yoda.
Preheat oven to 400 degrees. Carefully slice the spaghetti squash in half and scoop out the seeds with a spoon, discard. Place both halves on a baking sheet, flesh side up, and drizzle with olive oil and sprinkle with salt and pepper. Roast for about 30 minutes, until the skin begins to wrinkle and golden. Remove, let cool slightly, and then scrape out the spaghetti squash "noodles" with a fork. Place in a casserole dish, drizzle with some olive oil, add the sage and toss. Season to taste with salt and pepper. Set aside.
Over the stove in a medium-sized skillet, heat the tablespoon of olive oil and butter over medium heat. Add the shallots and garlic, and sauté until fragrant, a few minutes. Add the flour and whisk continuously until there are no lumps. Whisk in the chicken stock and cream, stirring frequently until sauce begins to thicken. Lastly, add the blue cheese and parsley, continuing to whisk. Season to taste with salt and pepper. Pour sauce over spaghetti squash and toss to combine. Sprinkle the top with bread crumbs and place back in the 400 degree oven, just until the bread crumbs turn golden and the sauce starts to bubble.
Cooking up a few chicken breasts should be a fast, easy, and delicious experience, but for many people it’s actually a slow, hard, and disappointing one. There are several reasons for this, and hopefully this demo for how to pan-roast chicken will eliminate them.
The most important factor is doneness. By “pan-roasting,” you can easily monitor the internal temp, and as I recommend in the video, start the pan sauce when the meat reaches about 150 F. By the time your sauce is done, and the chicken is covered in its hot, buttery goodness, it should have reached 155-160 F., which is what I shoot for.
At this temp, the chicken will be perfectly safe, while remaining moist and tender. I know many recipes, and reference sites, call for longer cooking times, and internal temps of 165-175 F., but that’s just crazy. Unless, you want tough, dry meat; in which case, that works wonderfully.
Also, I think it’s very important we leave the skin on. Not only does this add a lot of flavor, but also much-needed moisture. Even if you’ve been brain-washed into thinking the skin is “bad” for you, which it isn’t, you can peel it off before you eat it, but I recommend leaving it on during the cooking process.
And yes, we’d be getting even more flavor and moisture if we just left the breasts on the bone, but the whole point is for this to be fast to make, and effortless to eat. Otherwise, we might as well roast a whole chicken.
If you’re not into creating your own boneless, skin-on breasts, like we did in the video, you can have the butcher at the market do this for you. You’ll have to go to a larger store where they cut up their own chicken parts, and tell them exactly what you want, but they’ll hook you up at no extra charge. I really hope you give this easy, and very effective technique a try soon. Enjoy!
Ingredients for 4 portions:
4 boneless, but skin-on chicken breasts
salt and freshly ground black pepper to taste
1 tbsp finely chopped fresh herbs, optional
2 tbsp olive oil
1/4 cup *vinegar
4 tbsp cold butter, cut in smaller pieces
a splash of chicken broth or water, if needed to thin sauce
*I used apple cider here, but literally any vinegar will work. Some of my favorites are sherry, balsamic, rice, and champagne vinegar.
.png)