Baked Stuffed Brie filled with Cranberries & Walnuts – A Better Brie

One of the most common mistakes people make when serving cheese, is not letting it come to room temperature first, so that all the flavors can be fully realized. This beautiful, baked stuffed brie takes that principle to the next level.

I went with a festive, and seasonally appropriate filling of cranberries and walnuts, but I’ve done this with at least a dozen different fillings, so don't be afraid to play around. 

Believe it or not, Michele and I once had a frozen stuffed brie business for a brief time, and supplied them to some of San Francisco’s finest shops. The business was called, “A Better Brie,” and while we moved on to bigger and better things, we had a lot of fun doing them, and they were very well received. Candied pecan was our best seller, with caramelized mushrooms coming in a close second.

What you seen here is exactly how we used to put them together, so if you weren’t around these parts in the early 90’s, here’s your chance to taste what you missed. I really hope you give this baked stuffed brie a try soon. Enjoy!


Ingredients:
1 small wheel of brie (about 6 to 8 inches is perfect)
handful of dried cranberries, chopped
handful of chopped walnuts
enough puff pastry to cover (1/8-inch thick), plus extra for design
1 egg, beaten with 1 teaspoon water
-- Freeze for 1 hour, bake at 425F. for 20 minutes, or until the pastry is browned, and the brie is soft.

*By the way, do not skip the freezing for one hour step. The crust needs to bake to a golden brown before the brie starts pouring out, so it must be partially frozen when it goes in the oven. If you happen to make it ahead of time, and put it in the oven frozen solid, then I’d lower the temp to 400, and give it an extra 10 minutes or so, or until the cheese is runny.

Artisanal Italian Pasta

pumpkin torchio pasta

If you go to most grocery stores or supermarkets you can find dried pasta for as little as about $1 per package. At the same time there is “artisanal” dried pasta which costs at least twice as much, and often much more. Is it worth it? Yes, it is and here’s why.

Recently I was at an event where there was an in depth discussion about pasta. Big producers like Barilla make in 2 days what a smaller artisanal company like Rustichella d’Abruzzo produces in an entire year. But it’s not just about volume, it’s also about how the pasta is made.

One big difference is how the pasta is extruded. Artisanal producers use bronze dies, these create a rougher surface texture which allows the pasta to better absorb sauces or condiments. While sauces are important, so are the noodles! They should really taste good. Extruding the pasta through these dies is a slower process than using the teflon dies that industrial producers use. Bronze dies don’t last as long and are much more expensive.

The drying time in particular is also crucial. Smaller artisanal producers slowly dry the pasta and it sometimes takes up to 2 days, whereas large producers dry it as quickly as possible using heat. The resulting pasta is a noticeably different color. Industrial pasta effectively toasts the wheat by the use of heat, which gives it a different flavor altogether. It’s not terrible, it’s just not nearly as good.

Last but not least, one of the most important ingredients is the wheat itself. A proper blend of grain yields just the right texture and flavor.


Beyond wheat, there are also different ingredients. Today many companies often make pasta that is gluten free, organic or made from different grains. I tried some dried pasta from Rustichella made with different ingredients that lend not just color but flavor. They make tonnarelli (aka spaghetti alla chitarra) with squid ink, spicy red pepper and spinach, but my favorite was the pumpkin torchio (torches). The sweet flavor of pumpkin really shines in this pasta which is best dressed with a very simple sauce such as the one suggested on the package which combines sausage, white wine and sauteed onion.

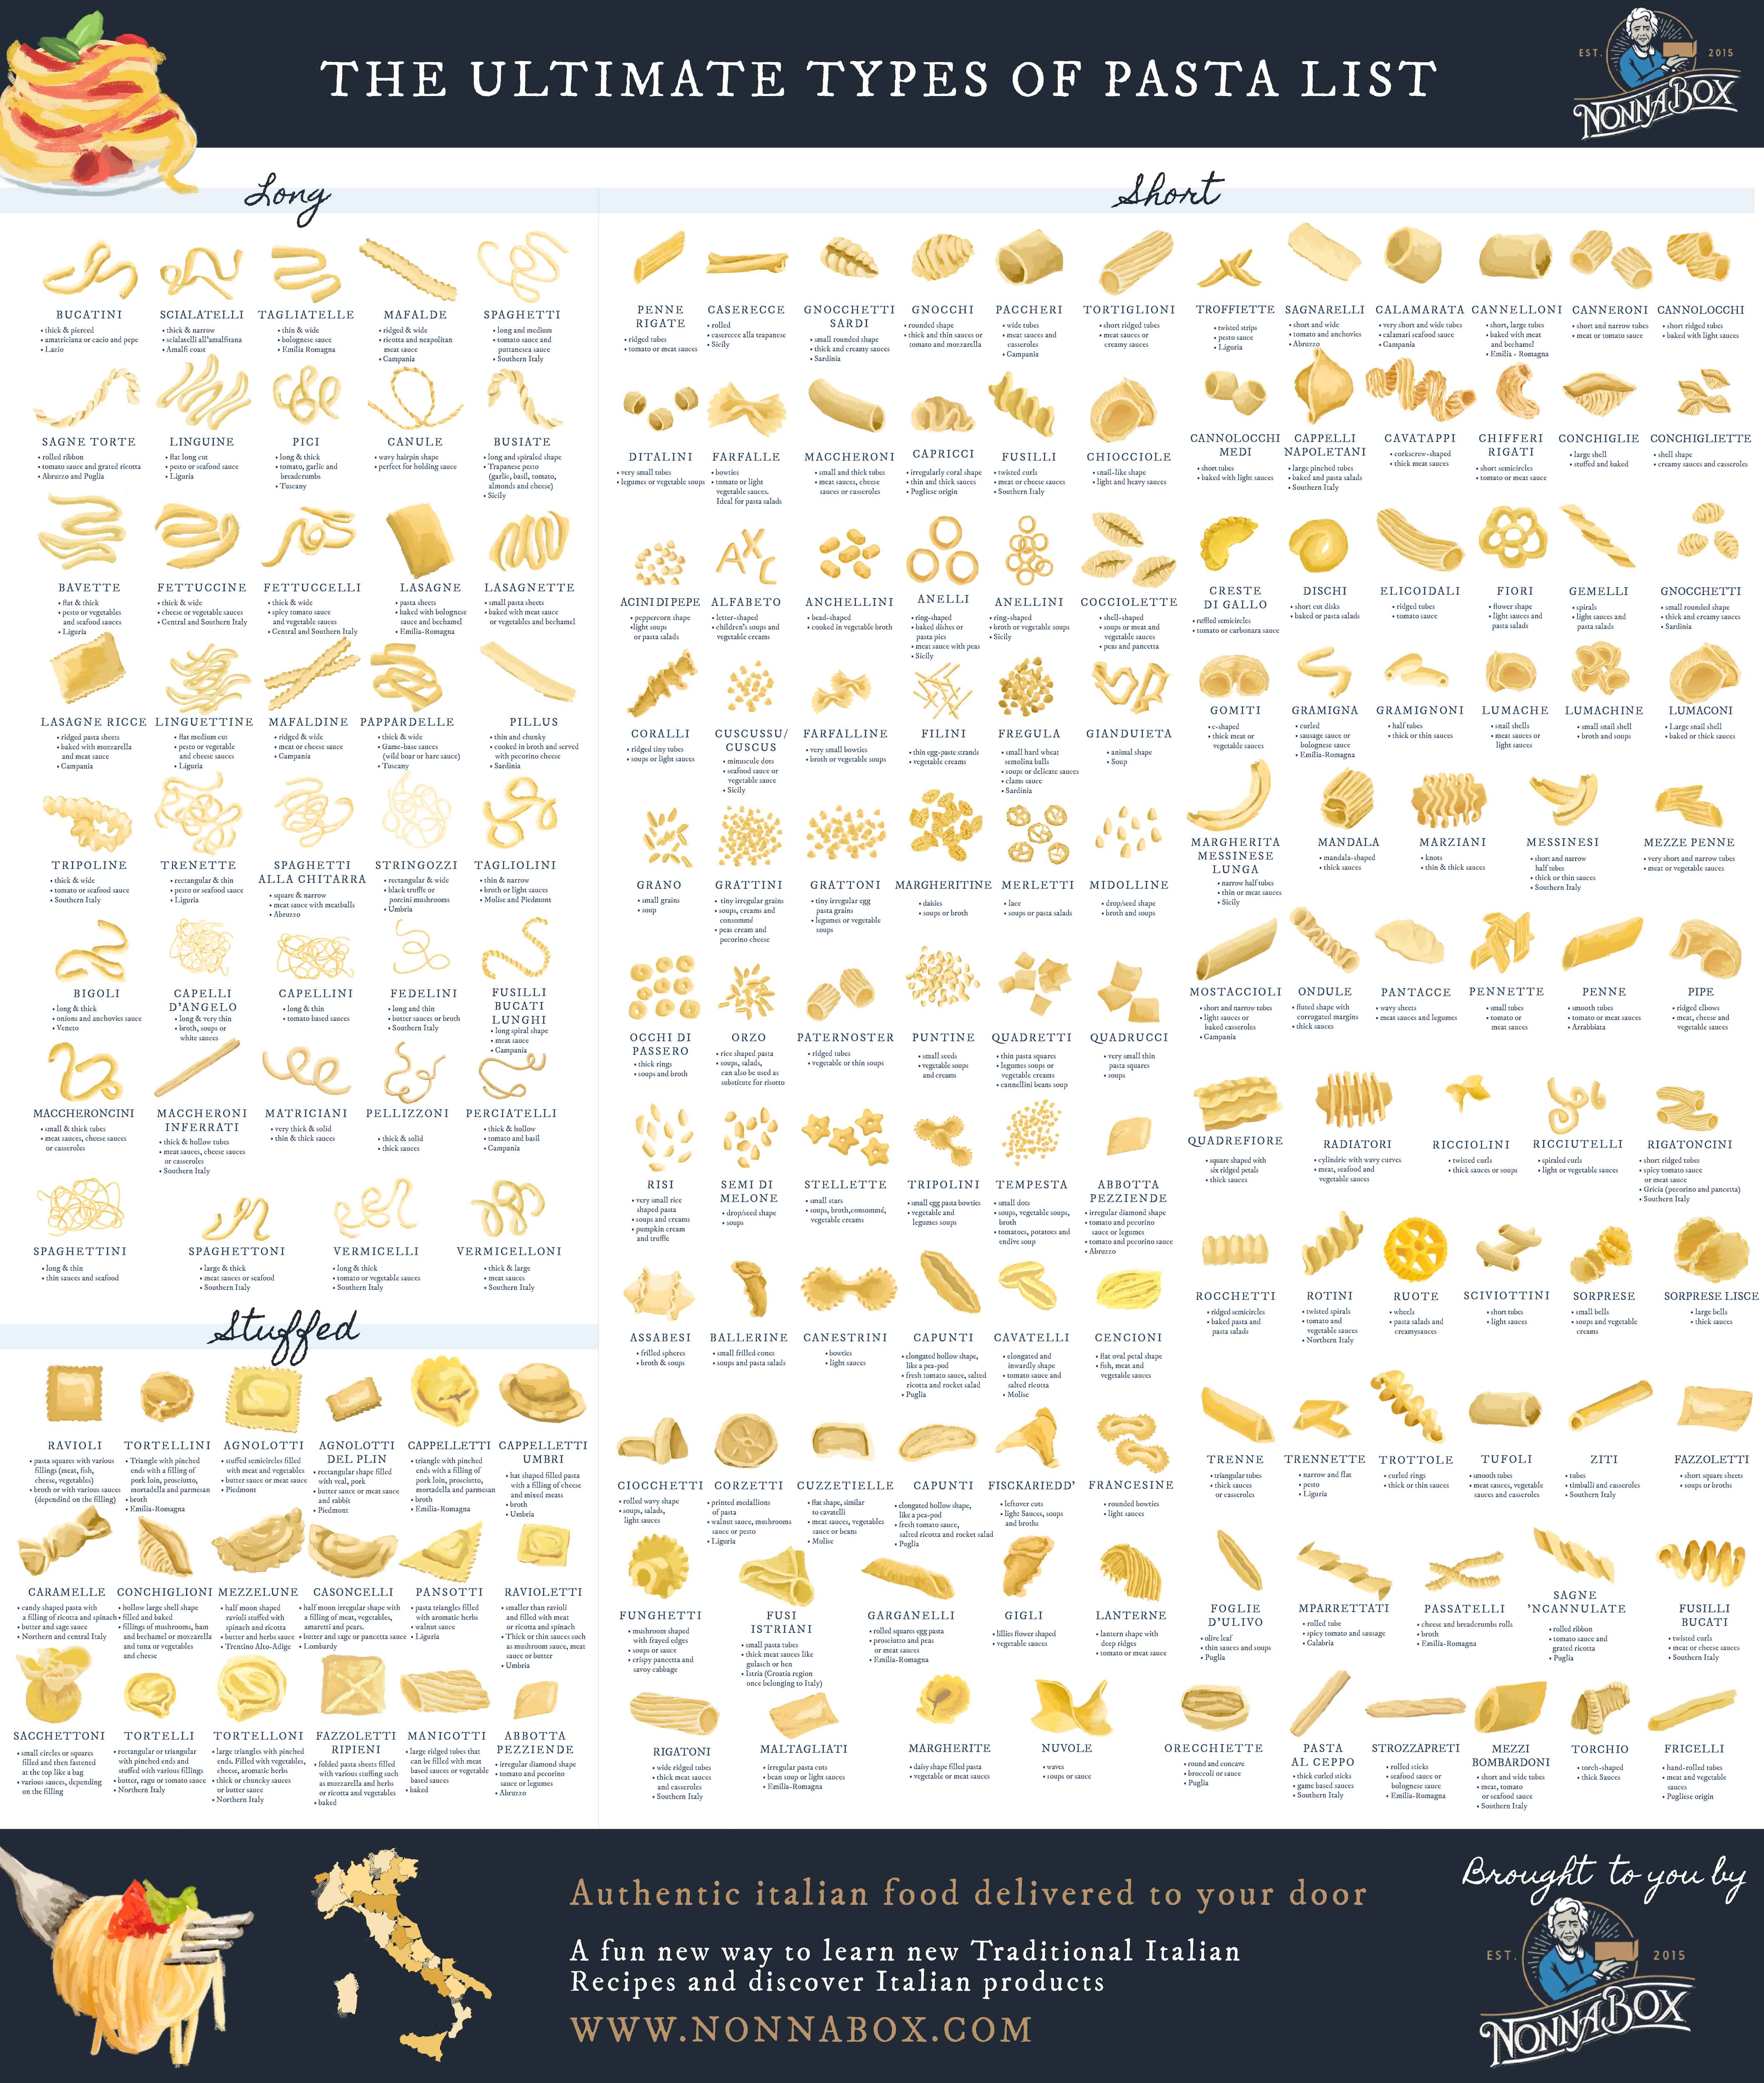
Curious about all the different types of pasta? This Encyclopedia of Pasta infographic helps to make sense of 188 shapes. Here’s my quick and easy guide to pairing pasta and sauce:

Long thin pasta—oil or tomato based thin sauces
Wide ribbons — thicker meat sauces
Cup or shell pasta — chunky with vegetables or bits of meat
Tubular pasta — thicker ragu style meat sauces
Mini pasta — soups or salads

Bottom line, pasta is relatively inexpensive. Considering it’s often the main part of a dish even $5-10 for 4-6 servings is quite reasonable.

Disclaimer: My thanks to Manicaretti for providing Rustichella d’Abruzzo products for me to review. 

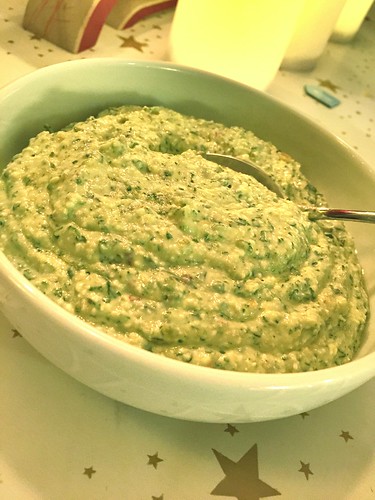
Pistachio Feta Coriander Dip

Untitled

Rarely do I read through a list of ingredients where every single thing sounds great. It didn't happen this time either, but it was pretty darn close. I was leafing through Persiana, the cookbook by Sabrina Ghayour that's at the top of my christmas wish list, and I stumbled upon a creamy dip with pistachios, feta and coriander as the stars. It had dill as well, which I don't like at all, and I changed the quantities to go with what I had at home. The result was glorious! Mostly salty and lemony but with a lovely crunch from the nuts.. oh, I can't wait to make this again!

Pistachio Feta Coriander Dip
one small bowl 

50 g pistachios (unsalted) 
1 tbsp olive oil
140 g feta cheese
large handful of coriander leaves (or two handfuls, really. Lots!)
1/2 garlic clove 
1/2 tsp sambal oelek (feel free to use red chili instead, and as much as you'd like - I like things mild...) 
zest and juice from 1/2 lemon 
2-3 tbsp greek yogurt 

Use a food processor. Start with the nuts and the oil and process briefly until coarsely chopped. Add everything else, and pulse until lovely and creamy. Taste to see if you want to adjust the seasonings. Then serve. Eat. Enjoy. Lick from bowl. 

Russian Tea Cakes – A Great Holiday Cookie by Any Other Name

As the old joke goes, these Russian tea cakes might not be Russian, but at least they’re not cakes. No one knows exactly how these came to be known as Russian tea cakes, but nevertheless, they are quite delicious, very simple to make, and visually ideal for holiday entertaining.

And when I say “easy,” I mean really easy. You dump everything in a bowl, and mix it with your hands until combined. Professional pastry chefs will lose their minds, since we’re forgoing their precious “cream the butter and sugar” step, but the final product is identical, no matter which technique you use.

The only tricky thing here is the baking time, since there are so many variables. Things like the size of the dough balls, whether you use a silpat or parchment, how light or dark the sheet pan is, etc., can all effect the final time significantly.

I think this cookie tends to get under-cooked, and some recipes call for as little as 12 minutes at 350 F. I like these fairly golden, so I get that nice brown-butter flavor, and that took me about 20 minutes or so, which is why I gave such a wide range. Start checking at 15 minutes, and proceed from there.

Thanks to their snowy appearance, these “cakes” would be perfect for your holiday dessert spread, don’t feel like you have to wait for a wedding, or for some Russians to come over for tea. I really hope you give these a try soon. Enjoy!


Makes about 28 to 32 Russian Tea Cakes:
1 cup (2 sticks) room temperature unsalted butter
1/3 packed cup powdered sugar (plus much more to coat finished cookies)
1 cup finely chopped walnuts (very lightly toast nuts in dry pan first for best results)
1/8 teaspoon salt
1 teaspoon vanilla extract
2 cups plus 2 tablespoons all-purpose flour
- Roll into just slightly larger than 1-inch balls, bake at 350 F. for 15 to 25 minutes, or until lightly golden

Crockpot Italian Chicken and Broccoli Rabe Chili


It's hard to write about how delicious this chili was when I've been dealing with my son's stomach virus all night/day.  So just trust me, this was delicious.  One of those easy crock pot recipes that are comforting, healthy and can feed an army.  I used boneless, skinless chicken thighs and when it came time to shred them, they just fell apart.  This isn't your ordinary, same old chili... it's uniquely different with loads of broccoli rabe, sliced red peppers, cannellini beans and parmesan cheese.  

You can find the recipe here.  Now if you'll excuse me, back to Lysol'ing my entire house.

Lamb meatballs


Untitled

I've done so many variations on lamb meatballs, really. These were inspired by the lovely Persiana cookbook by Sabrina Ghayour, which I found at my local library a few days ago. Her version contained pine nuts and raisins as well, but as I was out of pine nuts I had to omit those, and I'm not the biggest fan of raisins so I skipped that as well. But feel free to add in both! I changed a bunch of other things too, but loved the idea of adding cinnamon. My kids LOVED these - they're both pretty fussy eaters so I was thrilled that we could actually enjoy something together for a change. I 

Lamb meatballs
serves 4 (at least 2 adults, and 2 kids - I'd do more for 4 adults) 

500 g lamb mince
1/2 yellow onion, very finely minced
large handful of coriander, stalks and leaves, very finely minced
1 egg
zest of 1/2 lemon
1/2 tsp cinnamon
2 tsp cumin
salt 

Oil and butter for frying

Mix all the ingredients for the mince. Mix pretty well, it'll help the meatballs hold their shape and stay intact. Shape little meatballs, or any shape you like - I went for the fairly traditional oblong köfte (kefta) but that's up to you. 

Heat the oven to 150°C. Fry the meatballs in butter and (or) oil, until well browned but then move them to the oven and let them cook through. (I check mine with a thermometer, and I want them to be at least 70°C.)

Serve, with anything - we ate tomato bulgur and pistachio-feta dip. 

DIY Vanilla Salt


Vanilla Salt.  It's a thing!  You may already know about Vanilla Salt, but I did not until a few days ago, so please do not burst my bubble of excitement.  What a perfect topping for cookies and bars (like these, in fact).  And it would also make a great homemade gift this holiday season.    

I followed this tutorial, however, I did not use Grey Celtic Sea Salt.  I do not have that in my pantry, and I didn't feel like braving our horrendous Whole Foods parking lot just to get it.  So I used regular old coarse sea salt and it turned out just fine.  Easy peasy!      

XO Sauce Recipe


XO Sauce recipe
I’m recently back from a whirlwind week long trip to Guangdong province in China. The capital city Guangzhou is the home of Cantonese food and I am obsessed by many spectacular dishes I enjoyed there. Some were complicated like stuffed mud carp and a candy like crisp pork belly, and some were rather simple yet very compelling such as the congee I ate every morning topped with fried peanuts and some preserved vegetables. One of the simplest dishes I had was a pile of thin flat rice noodles tossed with vinegar, sesame seeds and a generous dollop of XO sauce. The savory, salty, fishy, hot and sweet ingredients in the sauce all meld together to make something greater than the sum of its parts.
xo sauce noodles
XO sauce was invented in Hong Kong, possibly Kowloon, in the 1980’s and there are many different recipes for it. The name XO means extra old, like you see on a very expensive bottle of cognac (popular in China). But there isn’t any cognac in XO sauce, although the dried seafood used in it is rather expensive. The sauce is primarily dried seafood and ham or sausage and pungent aromatics and while you can buy it, it’s extremely satisfying to make. Fortunately you can easily find all the ingredients for it easily in an Asian market. I found the dried shrimp and scallops in a refirgerated case with tofu and noodles. Use the absolute best quality you can find. 

This sauce is kind of crumbly and chewy. It’s super easy to make and just a pure umami bomb. Add it to fried rice, rice porridge, dumplings or noodles, steamed green vegetables or fish, or on anything you like! I’m thinking a jar of it would make a really nice gift this time of year but I wouldn’t blame you for keeping it all for yourself. My version of it is adapted from various sources primarily recipes by David Chang and Kylie Kwong. I first made David Chang's recipe but I felt it had too much ginger and garlic. My version is closer to what I had in China and unlike Chang's version mine includes shallots and Shaoxing wine. 

XO Sauce 

Ingredients

2 ounces dried shrimp, about 3/4 cup2 ounces dried scallops, about 1/2 cup
3/4 cup rice bran oil or other neutral flavored oil
1 cup thickly sliced Chinese sausage
1 Tablespoon dried red chile flakes
1/4 cup shallots, peeled and thinly sliced
1/4 cup garlic cloves, peeled and cut in half if large
1/4 cup fresh ginger, peeled and cut into chunks
2 Tablespoons Shaoxing wine
2 teaspoons soy sauce or tamari

Instructions 

Place the scallops and shrimp in a medium bowl and cover with water allowing extra water since they will absorb most of it.. Cover the bowl and let sit overnight. 

Heat the oil in a large skillet, preferably nonstick or cast iron. In a food processor pulse the Chinese sausage until finely minced. Place the sausage crumbles in the oil and cook for 3 minutes. Meanwhile drain the scallops and shrimp, place them in the food processor and pulse until finely minced. Repeat the process with the shallots, garlic and ginger. 

Reduce the heat to very low and add the chile flakes and minced scallops, shrimp, shallots, garlic, ginger, Shaoxing wine and soy sauce to the pan. Stir the mixture and let the sauce cook over very low heat for 45 minutes, stirring occasionally. The sauce should dry out and turn a deep redish golden color and have a thick sludge-like consistency. Remove from heat, let cool slightly then store in a covered jar in the refrigerator.

Enjoy! 

Salted Chocolate Pecan Pie Bars


Oh hi!  Remember me?  My name is Siri and I'm the gal who (occasionally) chronicles my journey with food on this here blog.  I've been absent, but I can explain (or I can spew excuse after excuse at you... like we were in LA for 12 days, or I lost my camera battery charger, or I'm trying to prepare for the 8 houseguests staying with us for 2 weeks, or I'm feeling overwhelmed with gift shopping, or I've been abducted by aliens... I sorta wish).  What it really boils down to is that when we travel, I lose my desire to cook and I come home feeling like I'm in a rut.  But this weekend, I spent an hour online looking at my favorite blogs and they lit a fire under my tushy!  (I'm a mom, I say things like that and potty.)  This week and next week be prepared for seasonal treats and dishes as well as gift ideas!  Yay!  And by the way, even when I'm absent on here, I'm pretty active on my blog instagram and my new mommy instagram accounts.  

So let's talk about these bars.  I'm not really a pie person, but ever since I ate Pecan Pie this Thanksgiving from this glorious bakery in California I've been craving it.  So when I saw this recipe I put it on my to-do list right away.  Holy crap, these are insane.  SUPER rich but beyond delicious.  If you like buttery shortbread and rich, salted chocolate and caramely pecan pie... you will love this.  I topped mine with Vanilla Salt which I'll write about later on today.

They also refrigerate and/or freeze very well, and a little goes a long way, so these would be perfect edible holiday gifts this season.  The best kind of gift if you ask me.    


Tomato Bulgur

Untitled

One of my favorite fast food restaurants served different varieties of chicken, and side dishes. I always got the crispy chicken fingers, and for sides always a tomato bulgur salad and really good noodles. And a chilli aioli, too. Oh I loved that place. It's sadly no more, and I never did figure out exactly how they made their tomato bulgur salad. It was served cold, and a little bit like this one but with added raw red onion, tomatoes, red pepper and coriander.

This isn't that, exactly, but it's a really good base. We ate this with lamb meatballs - köfte - and a yummy pistachio feta dip that I will soon tell you about.

Tomato Bulgur
serves 3-4

1 tbsp olive oil
1/2 yellow onion, very finely minced
2 tbsp tomato paste
1 tbsp butter
250 ml bulgur wheat
500 ml water
salt, black pepper

Heat the oil in a large frying pan (that you have a lid for). Fry the onion on medium heat for two minutes - it should soften but not brown. Add the tomato paste and stir well, fry for a few more minutes. Be careful, you don't want this to burn. Add the butter and when it's melted, the bulgur. Pour in the water and bring to a boil. Season with salt and pepper. Cover with a lid, lower the heat and simmer for about 20 minutes.